Crème Brûlée (Kem Cháy)

Crème Brûlée, a timeless and sophisticated dessert, has a rich and intriguing history that spans several countries and centuries. The name itself is French, meaning “burnt cream,” and it refers to the signature caramelized sugar crust that tops the delicate custard.
The earliest known reference to a dish resembling Crème Brûlée dates back to the late 17th century in France, where François Massialot, a renowned chef in the court of Louis XIV, included the recipe in his cookbook Le Cuisinier Royal et Bourgeois in 1691. Interestingly, Massialot’s version featured a method where a heated iron was used to caramelize the sugar, which remains a traditional technique today.
However, the origins of Crème Brûlée are a subject of debate, with claims of similar dishes being made in England and Spain. The English have a dessert called “Trinity Cream” or “Cambridge Burnt Cream,” which has been served at Trinity College, Cambridge, since the late 19th century. The custard in this version was marked with the college crest and then caramelized using a branding iron. Some food historians even suggest that Crème Brûlée might have evolved from the Spanish dessert crema catalana, a custard dish from Catalonia that also features a caramelized sugar topping but is typically flavoured with citrus and cinnamon.
Despite its debated history, Crème Brûlée has firmly established itself as a French classic. Its popularity surged in the 1980s, becoming a staple on restaurant dessert menus worldwide. Today, Crème Brûlée continues to captivate food lovers with its contrast of textures: the brittle caramelized sugar layer that gives way to a silky, creamy custard beneath.
This dessert remains a favourite for its simplicity, elegance, and the delightful experience of cracking through the caramelized crust with a spoon to reach the rich custard hidden beneath.
Q&As on Crème Brûlée
1. I don’t have a kitchen torch. Is there another way to create the caramelized top layer for Crème Brûlée?
Yes, you can use your oven’s broiler to caramelize the sugar on top of your Crème Brûlée. Here’s how:
- Preheat the broiler and adjust the oven rack so that the ramekins will sit about 2-3 inches below the heating element.
- Sprinkle an even layer of sugar on top of the custard.
- Place the ramekins on a baking sheet and set them under the broiler.
- Keep a close eye on the sugar as it melts and caramelizes, which should take about 1-3 minutes. Rotate the baking sheet as needed to ensure even browning, being careful not to let the sugar burn.
Using the broiler can be a bit tricky, as it can caramelize unevenly or burn quickly. Be attentive and remove the ramekins promptly once the sugar is melted and golden.

2. What happens if I use whole eggs instead of just the yolks for my Crème Brûlée?
Using whole eggs instead of just the yolks will change the texture of your Crème Brûlée. The custard will be firmer and less creamy, with a more set and slightly rubbery consistency. Egg yolks contribute to the rich, velvety texture that makes Crème Brûlée so indulgent, while egg whites add firmness and structure. If you prefer a classic, smooth, and silky custard, it’s best to stick with egg yolks only.
3. Can I use condensed milk or just regular milk instead of cream for Crème Brûlée?
Using condensed milk or regular milk as a substitute for cream in Crème Brûlée will significantly change the texture and flavour of the dessert.
- Condensed Milk: While it adds a rich, sweet flavour, it will make the custard overly sweet and affect the classic smooth texture. If you use condensed milk, you’ll also need to adjust the sugar in the recipe to avoid making it too sweet.
- Regular Milk: Using just milk instead of cream will result in a thinner, less creamy custard. The richness of Crème Brûlée comes from the high-fat content in cream, which gives the dessert its signature velvety texture. Using milk alone will produce a lighter, less indulgent custard.
For the best results and the classic texture, it’s recommended to use whipping cream or heavy cream.
4. My Crème Brûlée is runny and hasn’t set properly. What could be the reason for this?
If your Crème Brûlée is runny and hasn’t set, there are a few possible reasons:
- Underbaking: The custard may not have cooked long enough. Ensure that you bake it until the edges are set, and the centre has a slight jiggle when shaken gently. Depending on your oven, the baking time may vary, so check for doneness carefully.
- Oven Temperature Issues: If your oven runs cooler than the set temperature, the custard might not cook properly. Use an oven thermometer to verify the temperature and adjust if needed.
- Incorrect Water Bath: The water bath (bain-marie) helps regulate the temperature and cook the custard evenly. If the water level is too low or the water isn’t hot enough, the custard may not set. Ensure the water bath reaches two-thirds of the way up the sides of the ramekins and use hot (not boiling) water.
- Custard Mixture Issues: If the eggs and cream mixture wasn’t properly combined or strained, the texture could be affected. Make sure to gently mix the ingredients and strain the mixture to remove any lumps or curdled egg bits.
By troubleshooting these issues, you can ensure a perfectly set and creamy Crème Brûlée!

5. What happens if I overbake my Crème Brûlée?
Overbaking Crème Brûlée can lead to a less desirable texture. Instead of being smooth and creamy, the custard may turn grainy, curdled, or rubbery. This happens because the eggs in the custard cook too much and begin to coagulate, resulting in a texture that is dense and slightly scrambled. To prevent overbaking, bake until the custard is just set around the edges and still has a slight jiggle in the centre when gently shaken. Remember that the custard will continue to set as it cools.
6. Do I need to cover my Crème Brûlée during baking?
No, you don’t need to cover your Crème Brûlée during baking. Leaving the ramekins uncovered allows the custard to cook evenly and ensures that any moisture from the water bath does not accumulate on top of the custard. However, if you notice that the tops of the custards are browning or drying out, it may be a sign that your oven temperature is too high. In that case, lowering the temperature slightly should help.
7. How long can I store Crème Brûlée in the fridge?
You can store Crème Brûlée in the fridge for up to 3 days. Be sure to cover each ramekin with plastic wrap to prevent the custard from absorbing any unwanted flavours or odours from the fridge. For the best texture and flavour, only caramelize the sugar on top just before serving. Storing the custard without the caramelized top will keep it fresh and creamy until you’re ready to enjoy it.
8. Is it possible to create Keto Crème Brûlée?
Yes, it’s definitely possible to make a Keto-friendly Crème Brûlée! By substituting regular sugar with a keto-friendly sweetener, such as erythritol, stevia, or allulose, and using heavy cream, you can create a low-carb version of this classic dessert. Allulose is particularly effective for the caramelized top, as it melts and browns more like regular sugar, giving you that satisfying, crisp caramel crust.
Stay tuned, as I will be posting my recipe for Keto Crème Brûlée soon, complete with detailed instructions to help you make this delicious, sugar-free dessert at home!

Recipe for Crème Brûlée
Equipment
- 1 oven
- 1 small pot
- 1 kitchen torch
Ingredients
- 4 egg yolks
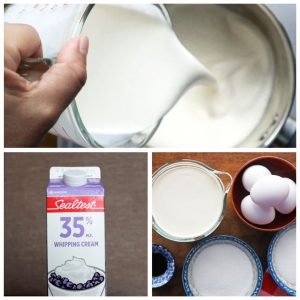
- 2 cups whipping cream
- ¼ cup sugar (for custard)
- ¼ cup sugar (for caramel topping)
- 1 teaspoon vanilla extract
Instructions
- Prepare the Ingredients:In a small pot, pour in the whipping cream and heat on low. Heat until the cream is warm to the touch but not boiling; it should be just hot enough that you can feel a gentle warmth rising from the pot. Remove from heat and set aside.In a medium mixing bowl, combine the egg yolks, ¼ cup sugar, and 1 teaspoon of vanilla extract. Whisk gently in one direction, mixing until the yolks are well incorporated. Then, gradually pour the warm whipping cream into the egg mixture in a slow, steady stream while stirring continuously.Pour the mixture through a fine mesh strainer into another clean bowl. This will help catch any curdled egg bits or impurities, resulting in a silky and uniform custard. If there are any bubbles or foam on the surface, use a spoon to carefully skim them off for a smoother texture when baked.Slowly pour the strained custard into the prepared ramekins, filling each one almost to the top, but leaving a small gap to prevent spills. Place the filled ramekins into a deep baking pan. Pour hot water into the baking pan, ensuring the water level reaches about two-thirds the height of the ramekins. This water bath, or bain-marie, helps to insulate the custard, allowing it to cook gently and evenly without overcooking or curdling.
- Bake:Preheat the oven to 325°F (160°C). Once the oven is ready, transfer the baking pan to the oven, taking care not to splash any water into the custard. Bake for 45 minutes to 1 hour, or until the custard is just set. To check for doneness, gently shake a ramekin; the custard should jiggle slightly, like gelatin, but the centre should not appear liquid. If needed, continue baking for a few extra minutes, checking regularly.Remove the baking pan from the oven, and carefully lift the ramekins out of the hot water using a towel or tongs to avoid burns. Let the custard cool to room temperature. Once cooled, cover each ramekin with plastic wrap and refrigerate for at least 3 hours to allow the custard to firm up completely. For the best texture and flavour, keep the Crème Brûlée in the fridge overnight. Chilling overnight helps the custard set to a perfect consistency, with a rich, creamy mouthfeel.
- Serve:Just before serving, take the Crème Brûlées out of the fridge. Use a paper towel to dab away any moisture that may have formed on the surface of the custard. Sprinkle an even layer of sugar, about 1 to 2 teaspoons, over the top of each custard. Make sure the sugar covers the entire surface evenly for a uniform caramel crust.Use a kitchen torch to caramelize the sugar. The sugar should bubble, turn golden, and then form a hard, glossy crust. Be careful not to overheat one spot, as it can burn quickly and develop a bitter flavour. Aim for a deep golden-brown colour with a smooth, crackly finish.Let the caramelized sugar cool for a minute to harden. Your Crème Brûlée is now ready to serve!

